Monday, January 5, 2015

Exodus Bible Study

I'm so excited! Today is the start of the Women Living Well Exodus Bible Study-- an 8 week study that covers every chapter of the book.  You read one chapter per day (Monday-Friday) and have a weekly passage of Scripture to memorize (if you so choose). You can find more information about it here:

 http://womenlivingwell.org/category/good-morning-girls/

This is the passage of Scripture to memorize for the entire study (or one section per week)--> Psalm 77:11-20. I've printed it out and set it on my printer next to my desk so that I'll see it everyday and will hopefully memorize it. The Bible says memorizing Scripture is important* and I am definitely lacking in that department. It's never too late to start though.

*Psalm 119:11 I have stored up your word in my heart, that I might not sin against you.
*Joshua 1:8 This Book of the Law shall not depart from your mouth, but you shall meditate on it day and night, so that you may be careful to do according to all that is written in it.
*2 Timothy 3:16 All Scripture is breathed out by God and profitable for teaching, for reproof, for correction, and for training in righteousness. 


As I study Exodus I also plan to read through the books of Psalms and Proverbs every month. F. Dean Hackett has made and graciously provided a free printable for each book to keep up with your reading progress. You can find them here:

http://www.fdeanhackett.com/2014/07/free-combo-pack-bible-reading-schedule.html


Let me just say here that I LOVE free printables. They're so fun. I found one for 31 Prayers to Pray for Your Husband. I printed all the sheets and then cut out each card individually. I punched a hole through them all and have put them on a little ring so that I can easily flip through every month. If you're interested in some of your own, you can find them here:

http://timewarpwife.com/theyre-here-prayer-cards-for-our-husbands/


Lastly, I'm excited to tell you about my new pens!! Yes, I know...pens. Roll your eyes if you want but I am such an office supplies junkie. These are not just normal pens though. These are special pens. You can write in your Bible without the ink bleeding through, smudging, or ripping your paper. They come in 8 different colors and glide across the page easily. Matt got me an ESV Journaling Bible several years ago and it leaves you room to write in the margins. I've been using pencil but it smudges. I tried pen and it smudged too, in addition to bleeding through the pages. Not anymore! These little pens are wonderful and I highly recommend them if you like to write in your Bible. You can find them here:

http://www.amazon.com/gp/product/B001H7U87A/ref=oh_aui_detailpage_o00_s00?ie=UTF8&psc=1


I hope you find encouragement this week to read your Bible, study & memorize Scripture, pray for your spouse and glorify God in all you do. He's worthy of your time.

Blessings


Thursday, January 1, 2015

What's New for 2015

Happy New Year!

I've decided not to have any big resolutions for this year. It seems my resolutions always seem overwhelming by the 2nd week of January and in turn, I don't keep up with them and then feel like a failure for the next few months.  So this year, I'm going with goals. If I meet my goals, great. If I don't, grace. Nobody's perfect.

*My first goal for this year is to read more.  To kick things off, I'll be reading a book Matt got me for Christmas titled "Fierce Convictions: The Extraordinary Life of Hannah More - Poet, Reformer, Abolitionist" by Karen Swallow Prior, 


in addition to beginning a study of the book of Exodus led by Courtney at http://womenlivingwell.org/

I'm very excited about the prospect of reading more.  Matt & I both have bookshelves in our offices filled to overflowing with wonderful books about Christ, music, history, hobbies, etc.  I think it's time that I open them up and begin to absorb the knowledge they offer.

*My second goal for 2015 is to blog more.  I started this blog back in 2010 and have severely neglected it, partly because I didn't make time for it and partly because I didn't think anyone ever read it.  My outlook has since changed.  I'm not writing to impress people with what I have to say because honestly, I don't have anything impressive to say.  I'm writing it because I want to chronicle Matt & I's adventures over the year, record thoughts I may have, blessings that I'm given, Bible study notes, book reviews, and pictures of all the wonderful (and maybe even not so wonderful) things that I encounter over the year.

I hope that 2015 holds many, many blessings for everyone.
I hope that Christ is glorified above all else.
And I hope that this year we all draw closer to the King than we ever thought possible.

Blessings

Monday, April 30, 2012

Spring Wreath Making

Being as how I'm addicted to Pinterest, I was constantly seeing such cute wreath ideas and finally decided to make my own. I'm so proud of it and it turned out exactly how I wanted. Hooray! The best part was that it was super easy and inexpensive. Most wreaths that are already made will run between $30-$90 depending on where you shop. My homemade wreath that looks exactly how I want it to cost me about $20 and it was such fun making it.

To make this wreath you'll need:

  • wreath form (woven, foam, or whatever you like; I used woven)
  • glue gun
  • wire cutters
  • fake flowers
  • yarn
  • ribbon
  • wooden letter
  • wreath hanger


I bought my fake flowers from the Dollar Tree where everything in the store is $1. I got 4 bundles of flowers total: 2 yellow, 2 orange. I went ahead and picked the same type of flower just in different colors because I thought it looked better. The first thing I did is push the little leaves on the flowers, that are about halfway down the stem, all the way up to the top. You can see the difference in the picture below with the orange flowers having the leaves pushed all the way up and the yellow not. Then I used wire cutters to snip the flower from the rest of the bundle. I did this so I could simply stick the flowers into the wreath without having to glue them on, and the originial stems were entirely too long.


I only wanted the flowers on one side of the wreath so I picked a spot somewhere near the middle of the side I wanted them on and just started sticking them in. Make sure that you can't see the stems of the flowers coming out the back of the wreath because when you hang it they may get pushed out when it's up next to the door.


Next I took my ribbon and glued it on the back side of the wreath underneath the flowers and wrapped it around the side without flowers, gluing the other end at the top on the back side of the wreath.


All that was left to do was wrap the letter with yarn. It was at this moment that I wished my last name started with an L or O or something easy to wrap. This was not the most simple task and took me longer than any other part, but it paid off. I got my letter from Hobby Lobby and they had letters in different fonts but I really liked this one. Word to the wise, think about how difficult your letter will be to wrap before buying it. Another option is spray painting it or wrapping it with scrapbook paper. I glued the end of the yarn to the backside of the letter and just started wrapping. Every now and then I had to cut the yarn, glue it to the back, and start with a new strand. Since it's glued to the back though, no one will ever know about your wrapping mistakes.  

Once the letter was wrapped, I took some extra yarn and tied the letter to the wreath. I suppose you could glue it but I had already unplugged my glue gun at this point and was too lazy to wait for it to heat back up.


And here's the finished product. It's super bright and colorful but since it's Spring, almost Summer, I thought the colors were appropriate. You could apply the same directions for making a wreath but with different colors and have one for every season :) 


Happy wreath making!!!


Monday, March 19, 2012

Grilled Chicken w/ Roasted Red Pepper Sauce

I love to cook and I'm always looking for new recipes to try. I found one-- Grilled Chicken w/ Roasted Red Pepper Aioli Sauce-- and I made it for my husband & I. He's so sweet and is always willing to eat whatever I give him, even if it's not very good. The grilled chicken was excellent but I'm not a huge fan of the roasted red pepper sauce. I think it needs to be revised before anyone eats it again. However, I'll go ahead and share the recipe in case you want to try your own version.


---Grilled Chicken w/ Roasted Red Pepper Aioli Sauce---

Ingredients for marinade:

-4 boneless, skinless chicken breasts
-2 Tbls. lemon juice
-1 Tbls. garlic puree (or minced garlic)
-1 tsp. dried poultry seasoning (I used Mrs. Dash Chicken Seasoning)
-4 Tbls. olive oil


Directions for marinade:

-Trim all visible fat from chicken breasts, then cut small slits going down the length of each breast
-Whisk together the lemon juice, garlic, poultry seasoning, and olive oil
-Put chicken in Ziploc bag or container where the chicken can lie in a single layer and absorb as much of the marinade as possible
-Pour marinade over chicken and flip chicken over a few times to dispense the marinade equally. I also massaged the marinade into the small slits into the chicken
-Let chicken marinate in the refrigerator for 6-8 hours, or up to 24 hours if you need to marinate the chicken ahead of time


Beware! This smells so good you'll want to eat it raw. Please refrain!


-When ready to cook, remove chicken from fridge and let it come to room temperature
-Oil the grill with olive oil or non-stick spray
-Heat the grill to medium-high
-Cook chicken 4-5 minutes on each side until it is cooked through, firm, and lightly browned


Ingredients for roasted red pepper aioli sauce:

-1 jar roasted red peppers (12 oz.) or 2 freshly roasted red peppers (about 1 cup diced roasted red peppers)
-1 Tbls. garlic puree or minced garlic
-1/2 cup mayo
-3 Tbls. extra-virgin olive oil
-salt and pepper to taste


Directions for roasted red pepper aioli sauce:

-If you're using a jar of red peppers, put peppers into a colander placed in the sink and let drain for a few minutes, then use a double layer of paper towels to blot both sides of the peppers, drying them off as much as you can, coarsely chop peppers
-Put chopped peppers and garlic into the food processor and process about 20-30 seconds until peppers and garlic are finely pureed
-Add mayo and pulse about 8-10 times, or until mayo is well mixed with the peppers
-Add the olive oil one Tbls. at a time, blending for a few seconds after each Tbls. of oil.
-Season with salt and pepper to taste

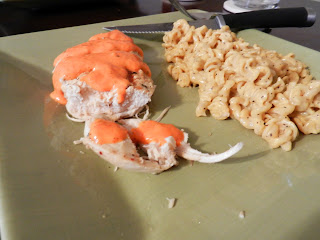
It will be a pretty bright orange color

I fixed our favorite mac n cheese with it and it was delicious.


Yum! Yum! Yum!


I would revise the sauce, maybe by adding some parmesan cheese or a packet of dried Zesty Italian seasoning mix....feel free to experiment. Enjoy!

Tuesday, March 6, 2012

New Craft Projects

Again, Pinterest is my source of inspiration. I can't take all the credit.

I have 2 new craft projects that went extremely well.....to be honest, it's not like they were super hard to make, but since I'm not the most crafty person and I have to (steal) borrow other people's ideas, these 2 projects were excellent for me.

The first one was needed in our home because I didn't have any way of keeping up with what I was making for dinner each night of the week. I guess I could just write it on paper but that's not very exciting. While browsing on Pinterest, I found a great idea on how to keep up with dinner for each night of the week and add a little color to my kitchen.

Project #1:
--picture frame
--scrapbook paper
--dry erase marker
--scissors


You will need to cut the scrapbook paper to fit inside the frame. I found that the easiest way of measuring the paper to fit is by taking out the sample picture that is included with the frame and use it as a model for what size the scrapbook paper needs to be.


Once you've cut the scrapbook paper to fit inside the frame, place it between the glass and the back of the frame, just like you would a picture.


Now, hold your breath, take a DRY ERASE MARKER  (((NOT A SHARPIE))) and write on the glass. At first I was scared. What happens if the marker stains the glass? Will I have to throw the whole frame away? Did I just spend money on a new frame for nothing?

But...I took the plunge and I wrote on the glass. Seconds...and I do mean seconds later....I quickly took a paper towel and wiped the marker off the glass and it was as good as new. Perfect! I now use it for all my menu making needs. Enjoy :)


~~~~~~~~~~~~~~~~~~~~~~~~~~~~~~~~~~~~~~~~

Matt and I have been married for almost 1 year &  8 months now and we've already experienced A LOT! So much in fact that sometimes we sit around talking about things that have happened, but we can't always remember. This project is perfect for our frequent memory lapses. It's called a memory jar. The purpose is to write down memorable events, whether happy or sad, as they happen and put them in the memory jar. At the end of the year, we're going to start a tradition where we sit down together and read all the memories as we reflect on the past year. I think this is a great idea and I'm super excited I found it and that I'm able to share it with you.


Project #2:
--2 different pieces of scrapbook paper
--candle jar
--scissors
--tape or glue


First, you will need to choose which piece of paper you want to be on the majority of the jar. Then you will need to cut that paper to fit inside the jar. Unfortunately, my jar wasn't even on the inside so I had to tape my paper to the outside of the jar.


**As a side....I left the empty plastic sack that once contained all my craft items on the floor. While I was making my little projects I heard a rustling behind me. This is what I found....

Kitten staring into the sack---what's in the sack?


A sweet, little Millie :)---isn't he adorable??


Okay! Back to the project....

You have just cut the paper to fit inside or outside the jar, whichever you prefer. Next, cut out a little rectangle of the 2nd piece of scrapbook paper to tape on top of the 1st piece of paper. Write whatever you would like on it. I wrote '2012 Memories'.


Once you have your smaller piece of paper with the writing on it, tape or glue it to the larger piece of paper. Since my bigger paper wouldn't fit inside my jar, I taped it to the outside.


All done! I use colorful pieces of construction paper to write my memories on but you can use whatever you would like or have handy. I probably should have posted this when I actually made it in January but, better late than never. Hope you enjoy!